This is a fairly new model yet, and I haven't come upon a good fairing how-to. Here are some tips that may be helpful. This information applies to 2011, 2012, and presumably 2013 models.
Start by removing the dash panel. Take out the 4 screws (4mm Allen) and work the panel rearward to free it.
 A good next step is to remove the plastic fasteners that stitch the fairing side panels to the inner front panel. There are two types. The smaller ones (4 on each side - see photo at right) which are found at the top and sides are removed by pressing the center pin inward. You'll feel a pop when the pin slides in about 1/8", and then the fastener can simply be pulled out with your fingers. A thin-bladed screwdriver or putty knife works well to slide under the head and lift them out. Once these are out you'll want to pop the center pin back out, past flush, to prepare them for reuse. More on that later.
The two larger fasteners (not shown in the photos) are down at the chin of the fairing. Remove them by sliding a small flat screwdriver under the center pin's round head and popping it up. There's a notch on one side that's a good spot to grab. Once the head pops up you can remove the fastener with your fingers.
Let's start on the left side for no particular reason at all. Remove the 2 large (6mm Allen) and 1 small (5mm Allen) bolts (see photos below). There are two mechanisms holding it in place yet, so don't worry about dropping it.


 The first is a set of rubber inserts (see photo). Once all plastic and metal fasteners are removed, grab the rear upper edge of the panel and pull straight away from the bike with a few short tugs. The 3 posts on the inside of the panel will let go of the rubber bushings and the panel will move outward a bit. Do not pull further at this point.
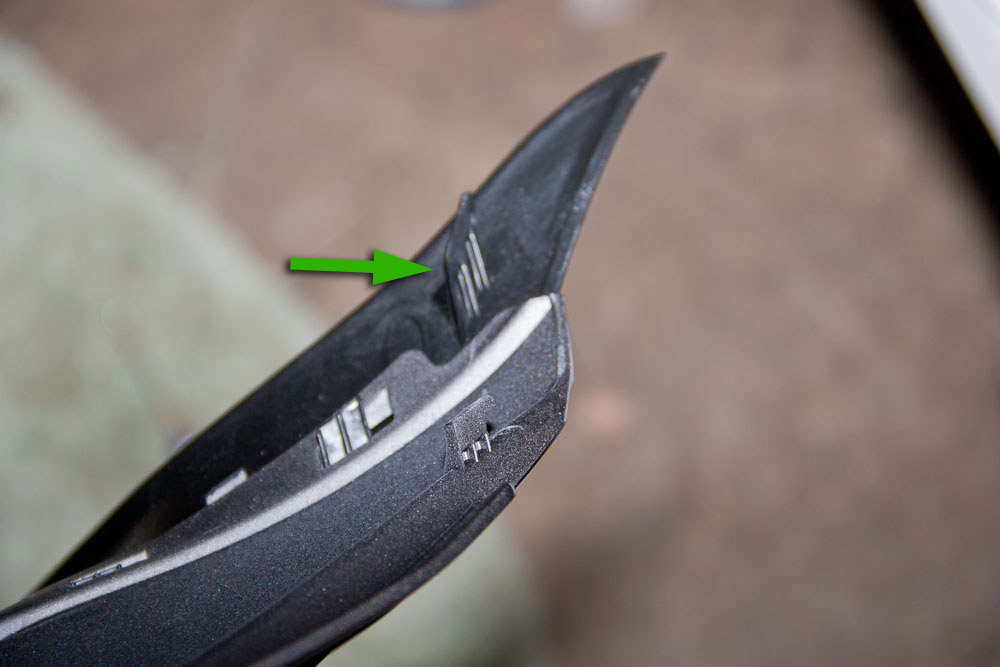
The only thing still holding the panel to the bike are several tabs at the top edge and front corner (see photos below). The first move here is to slide the fairing rearward about half an inch. This moves two keyhole slots to their wider ends and releases the nose tab, allowing you to swing the fairing outward at the bottom without doing damage. If you grab it with your fingers and press against the dash with your thumbs it comes pretty easily. (Read more about these tabs and how to make them work better at RiderForums.)
Once it's slid back, tip the bottom out a bit. Wiggle and jiggle until it comes free. Don't get impatient here. There's a lot of leverage on those fragile tabs and slots.


Set the panel somewhere safe on a soft surface. All those sharp edges and corners will get scuffed up on a hurry on concrete, and you don't want the kids bouncing a basketball off it while you work.
Now on to the right side. Here the process is nearly identical, but we have only two fairing bolts and there's the exhaust cover to deal with. Let's start with that.
There's one bolt holding it on and two rubber grommets. Go ahed and remove that bolt (4mm Allen - see photo below). Notice how the two tabs on the cover are angled differently in the photo below. One is oriented upward and the other toward the bike. A little twisting and wiggling works it free. Set it somewhere safe.


 Now remove the two fairing bolts (see photo at right). Using the same procedure as on the left side, tug the rearward edge of the fairing panel out of the rubber grommets, then work it free of the slots up front. Again, be patient here to avoid damage, then set the panel somewhere safe.
Installation is the reverse of removal. Pay particular attention when engaging the upper fairing tabs to make sure that the little one in the front corner slides into its slot. Some inward pressure on that pointed area helps. Once the tabs are slid forward in their slots that front corner should lay nicely in with the headlight surround and front underpanel.
Carefully align the fairing pins with the rubber grommets and press them in. Then start reinstalling bolts and finally the plastic pop fasteners.
Feel free to ask questions or make suggestions using the comments feature below. I'm rowdyred94 if you happen to be from RiderForums.
Happy riding!
Follow